

You've probably wondered more than once what that option in the WooCommerce shipping settings is for – the one that is somewhat hidden and leaves us unsure of what to do with it.
We're talking about "Shipping Classes," which is a more important tool than it appears because it allows you to make certain shipping methods available only for certain products, based on their characteristics or any attributes that distinguish them from others. Likewise, it also enables you to exclude certain shipping methods from specific products, giving you a vast array of possibilities when configuring your shipping costs.
Do you want to offer shipping costs to a specific category of your catalog and not to others? Shipping Classes will help you achieve that. Are you into dropshipping and want to provide different shipping costs for products from one supplier compared to another? Shipping Classes to the rescue!
How to Set Up Shipping Classes
But before we explain what they can do for you (or your client), let's see how to set them up. As you may have noticed, by going to the "Shipping" tab in WooCommerce, there is a direct link to "Shipping Classes." There, you can create as many classes as you need.
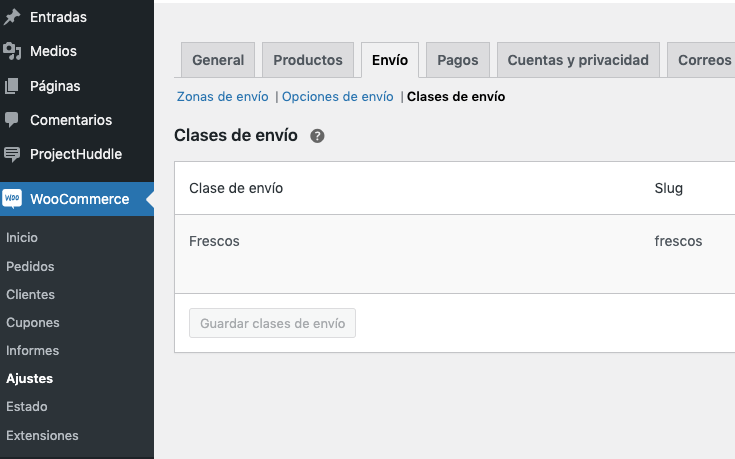
It's best to name the classes with a reference to the products they'll apply to. For instance:
- If it's a specific product, you can name the class after that product directly.
- If there are multiple products, you can use the name of the category those products belong to, or if you don't want to group them by category, you can use something that distinguishes them.
- You can also name the classes based on the type of shipping you will apply, such as "Fresh Products," "Perishables," "Lightweight," "Heavyweight," or even "Free" (if you want a product or several products to have zero shipping cost).
Applying Shipping Classes to Products in Your Online Store
Once the classes are created, we can then assign them to the products. And WooCommerce makes it very easy for us. We can do this in two ways: for individual products or in a bulk manner.
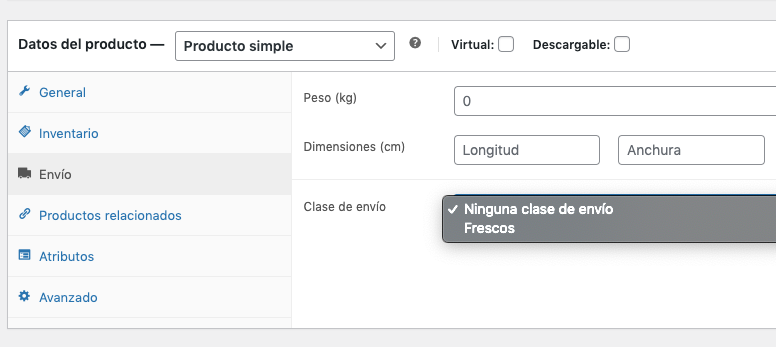
For individual products, we need to go to the settings of any specific product and navigate to the "Shipping" tab. There, just below the weight and dimensions options, we will find a dropdown where we can choose the class we want to assign. Obviously, if we haven't created any classes beforehand, the dropdown will appear empty, so it's mandatory to create them first. We save the changes and we're done.
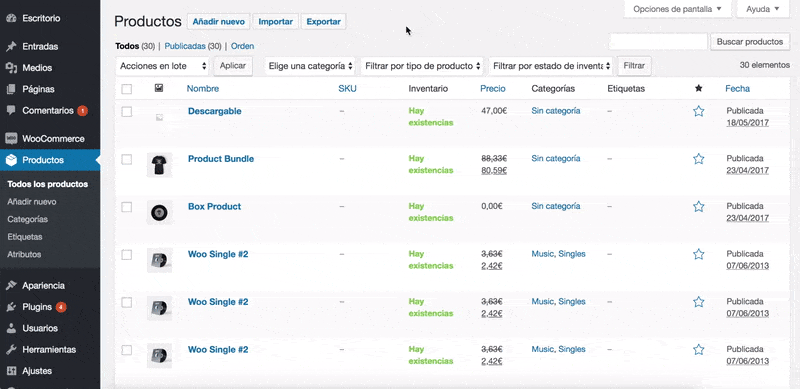
But if we are going to assign a class to multiple products, it's best to do it in bulk. To do this, we'll go to the list of products and start selecting the ones we want. We can filter by category (using the filters at the top of the list), and once the category is selected, we can click on the multi-select checkbox to avoid going one by one, which will make our work easier 🙂 Then, we'll click on the "Bulk Actions" dropdown and choose "Edit." This will open the bulk product editor (right in the same list), where we will look for the "Shipping Class" option to, as you might have guessed, select the class we want to apply to the products.
Update, and we're done. Now we have a whole group of products (which may or may not correspond to an entire category) assigned to a shipping class. Quick and easy, isn't it?
What can we do with the products from the Shipping Classes in WooCommerce
Great, we now have our products assigned to a shipping class, but what do we do with all of this? As I mentioned at the beginning, it opens up a world of possibilities for us to differentiate these products when configuring the shipping methods and costs for the store. Let's explore some examples, as this will make it easier for everyone to grasp the potential of Shipping Classes.
Example 1: Our online store sells food products, and some of them are fresh or perishable. Therefore, they need to be shipped urgently or in refrigerated transport, which increases the shipping cost specifically for that type of products. While we have a standard shipping cost for regular products, fresh products will require a higher shipping cost (if we want to avoid losing money on shipping).
Example 2: Another scenario would be for larger-than-normal products. Let's imagine we have a decoration store where we sell relatively small ornaments that can be shipped in a regular package and don't incur significant costs according to our transportation agency's rates.
However, we decide to add floor lamps to the catalog that are shipped in quite voluminous boxes, resulting in the agency charging us a considerably higher price than what we usually offer. In this case, we would create a shipping class for the lamps to subsequently establish a shipping method with higher prices (pardon the redundancy). After all, sending a box that's 20x20 centimeters is not the same as sending one that's 1x1.50 meters, you know.
Example 3: So, you've got this Dropshipping shop, and you're figuring out how to set up shipping costs based on where the stuff's coming from, right? Well, here's another example that'll show you how Shipping Classes can be a real game-changer. Check it: we can make these classes and tag 'em onto products from different suppliers. Like, you'd have a class for "Supplier 1," another for "Supplier 2," and keep on going for however many suppliers you've got.
This is because each supplier likely has its own shipping cost, and customers in your store will see the product price according to the supplier it belongs to. Fantastic, right?
And how do we apply the shipping methods and costs to the classes?
Although we've saved it for last, perhaps this final point is the most crucial of all: providing distinct shipping prices based on the classes. And it's quite straightforward! Whether you're utilizing WooCommerce's default shipping (please note, this can only be used with the "Flat Rate" method) or a plugin like "Super Shipping for WooCommerce," you can precisely specify which class, out of the ones you've created, you're assigning a method and a price to. You'll have access to all the features that either the flat rate or the advanced shipping plugin you're using can offer. Let's delve into how this works:
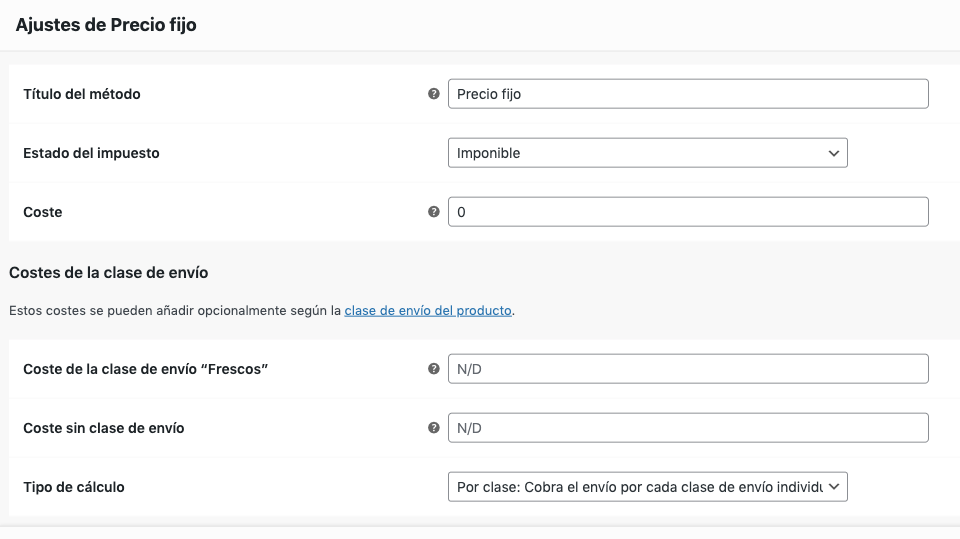
In the Shipping Zone you're configuring, add a new "shipping method." If you're using the default WooCommerce option, you'll notice that in the "Flat Rate" method, whenever a class exists, new configuration options will appear where you can select the class to which you want to apply the specific price (if you only have one class, it will appear by default).
Next, apply the cost, and there you have it! A differentiated shipping price for some products and another price for other products. And you thought this couldn't be achieved...
BUT... (yes, there's a "but") what if our shipping costs need to take into account the weight of the products, their volume, we want to send based on the number of products in the cart, etc... and we also want to differentiate these by Shipping Classes?
The solution is quite simple: Super Shipping for WooCommerce, the advanced shipping cost plugin for WooCommerce that can do that and much more. If you want to learn how to do it, you have the plugin's documentation available here. Additionally, we explain it in detail in the following post.